


Voor behandeling
-
Road to Brakkeput
Suzanne Perlman
1951
olieverf op hardboard
121 × 121 cm
Stedelijk Museum Amsterdam
-
Deformaties in de hardboard drager als gevolg van waterschade
Tidelines en vlekken op de verso
Vezelverlies en scheuren langs de randen
Kleine perforatiegaatjes
Loszittende verf en lacunes
Vergeelde vernis met ingebed vuil
Oppervlaktevuil
-
Doel om structurele problemen aan te pakken, een cruciale ingreep gericht op het voorkomen van verdere schade aan zowel de verflaag als het hardboard, en op het verbeteren van de visuele uitstraling door verstoringen in de compositie te verminderen.
Droge oppervlaktereiniging
Consolidatie van de verflaag
Uitlijsten
Consolidatie van gedelamineerde hardboardranden
Vlakmaken van de deformaties in het hardboard
Verwijderen van oppervlaktevuil
-
![Voor behandeling]()
Voor behandeling
-
![Voor behandeling (strijklicht)]()
Voor behandeling
(strijklicht)
-
![Achterzijde voor behandeling]()
Achterzijde voor behandeling
-
![Achterzijde voor behandeling]()
Achterzijde voor behandeling
(strijklicht)
-
![Voorzijde voor behandeling]()
Voorzijde voor behandeling
(ultraviolet licht)
-
![Perlman zittend naast het schilderij]()
Perlman zittend naast het schilderij
Afbeelding: Instagram Suzanne Perlman


highlights
Langs de randen van het hardboard waren kleine zones met delaminatie en losse vezels zichtbaar. Deze kwetsbare plekken vormden een risico tijdens het hanteren, waardoor eerst consolidatie nodig was voordat de behandeling veilig kon worden voortgezet.
De randen zijn licht bevochtigd met gedemineraliseerd water en vervolgens geconsolideerd met 3 en 5 procent Benecel A4C. Aan beide zijden van het paneel zijn siliconencoated Melinex en blottingpapier aangebracht, waarna de randen één tot twee uur voorzichtig zijn geklemd. Een eenvoudig klemsysteem zorgde ervoor dat alles tijdens het drogen goed op zijn plaats bleef. De consolidatie is zowel aan de voor- als aan de achterkant uitgevoerd.

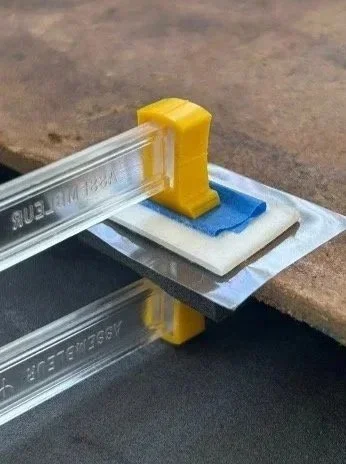
rechtsboven: vóór de behandeling rechtsonder: na de behandeling links: klem- en consolidatiesysteem
Voorafgaand aan de vlakbehandeling zijn de conditie en de zichtbare oppervlakteverschijnselen van het schilderij zorgvuldig gedocumenteerd en gefotografeerd, zodat eventuele veranderingen goed konden worden gevolgd. Om de algemene vervorming van de drager in kaart te brengen, zijn op meerdere punten metingen uitgevoerd.
Aan beide zijden van het werk zijn twee identieke blokken geplaatst die een houten lat boven het oppervlak ondersteunden (rechterafbeelding). Met meetlinten zijn de blokken nauwkeurig uitgelijnd en vervolgens in stappen van 10 centimeter langs beide randen verplaatst. De meetresultaten zijn vastgelegd in Excel en omgezet in een vervormingskaart, waarop de hoogste en laagste punten van de verso duidelijk zichtbaar worden (linkerafbeelding).


De metingen (in mm) geven de verticale afstand weer tussen het oppervlak en de lat. De waarde is vooral van betekenis in relatieve vergelijking en minder in absolute nauwkeurigheid. Het diagram visualiseert het vervormingspatroon: donkerrode gebieden duiden op de hoogste punten van het oppervlak, terwijl lichtroze gebieden de laagste punten aangeven.
Om de vervormingen in het doek te verminderen zonder het gebruik van vocht of warmte, is gekozen voor een geleidelijke mechanische vlakbehandeling. Het schilderij bleef daarbij de hele tijd met de verflaag naar boven gericht, zodat de conditie van de verf goed kon worden gevolgd en kwetsbare zones niet onder spanning kwamen te staan.
Over het verfoppervlak werd een laag siliconencoated Melinex gelegd om te voorkomen dat er iets zou hechten. Daarbovenop kwam een laag PE schuim van 1 centimeter, die een zachte maar ondersteunende druk gaf op het impasto. De meest kwetsbare hoek kreeg een extra stukje schuim voor extra bescherming. Vervolgens werd een stijve multiplexplaat van 122 bij 122 centimeter bovenop geplaatst, met daarop gelijkmatig verdeelde gewichten.
Een eerste test, die een nacht duurde, liet al een meetbare vermindering van de vervorming op twee punten zien. De verfhechting, het impasto, de craquelure en de randen bleven stabiel. Daarom is de behandeling voortgezet onder nauwlettende observatie. In de weken daarna trad geleidelijke afvlakking op, vooral in het gebied van de centrale bolling. Toen de voortgang stabiliseerde onder alleen de multiplexplaat, is extra gewicht toegevoegd. Tot nu toe zijn er geen negatieve effecten op de verflaag waargenomen.
De behandeling is nog gaande. Mocht de vooruitgang opnieuw stagneren, dan kan gematigde warmte, bijvoorbeeld met een verwarmde siliconenmat, worden overwogen.

Opstelling voor de vervormingsbehandeling:
Plaats het schilderij met de verflaag naar boven op een zachte ondersteuning.
Leg een laag met siliconen gecoate Melinex bovenop.
Voeg 1 cm PE‑schuim toe, plus extra stukken indien nodig om de druk beter te verdelen.
Plaats voorzichtig de multiplexplaat erbovenop.
Breng extra gewichten gelijkmatig over het oppervlak aan.